Tools > Attach Subset (Array of Ranks)
Lets you indicate which processes TotalView should attach to when these processes begin executing. Limiting the processes to which TotalView attaches is beneficial as TotalView does not have to be concerned with unattached processes. That is, because you know that you will not be interested in a what goes on in within a process, you can cut down on the time that TotalView uses to attach to all or most of your processes.
NOTE: TotalView lets you start MPI jobs in two ways. One requires that the starter process be under TotalView control and have special instrumentation for TotalView, and the other does not. In the first case, you will enter the name of the starter program on the command line. The other requires that you enter information into the File > New Program or the Process > Startup Parameters dialog boxes. The Attach Subset command is only available if you directly name a starter program on the command line. This is discussed in the TotalView Users Guide.
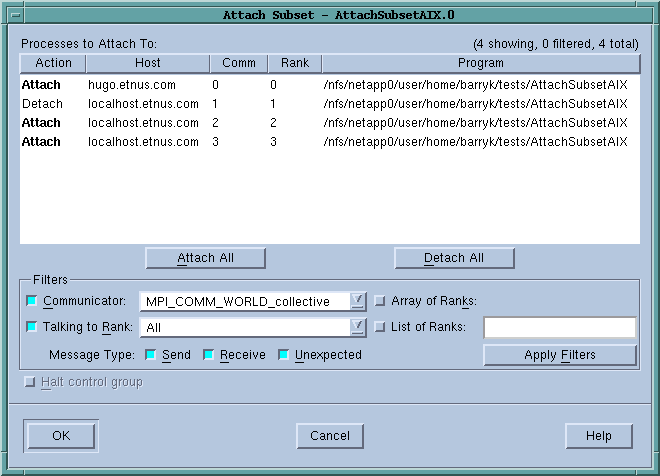 |
Processes to Attach To
Use the controls in this area to specify the processes to which TotalView should attach when they are created. You have three choices:
Selection Area
Individually select or deselect processes
All
Attach to all of the listed processes.
None
Do not attach to any of these processes.
After selecting All or None, you can individually select or unselect processes. That is, if you only want to select a couple of processes, begin by clicking None, then select the few to which TotalView should attach.
Filters
You can restrict the list by selecting the controls in this area.
Communicator
The communicators within this list tell TotalView which processes it should display. Selecting one of the communicators contained within this list tells TotalView that it should only display processes using this communicator. You can then select or clear these values in one of the three ways just discussed.
Talking to Rank
TotalView will limit the graph to communicators that receive messages from the indicated ranks. In addition to your rank numbers, TotalView includes two special variables: All and MPI_ANY_SOURCE.
Message Type
TotalView will only show Send, Receive, or Unrestricted messages.
Array of Ranks
This checkbox is automatically selected by TotalView if you have invoked this command from the Tools > Attach Subset (Array of Ranks) command. If the Variable Window is displaying an array, invoking this command tells TotalView that the array’s elements indicate ranks.
Halt control group
Selecting this button tells to stop all of the processes in the current process’s control group after it attaches to a process. If it isn’t selected. TotalView will immediately execute the control group after it attaches to them.
Tools > Array Viewer
TotalView provides another way to look at the data in a multi-dimensional array. The Variable Window’s Tools > Array Viewer command opens a window that presents a slice of array data in a table format, Figure 106. You can think of this as viewing a "plane" of two-dimensional data in your array.
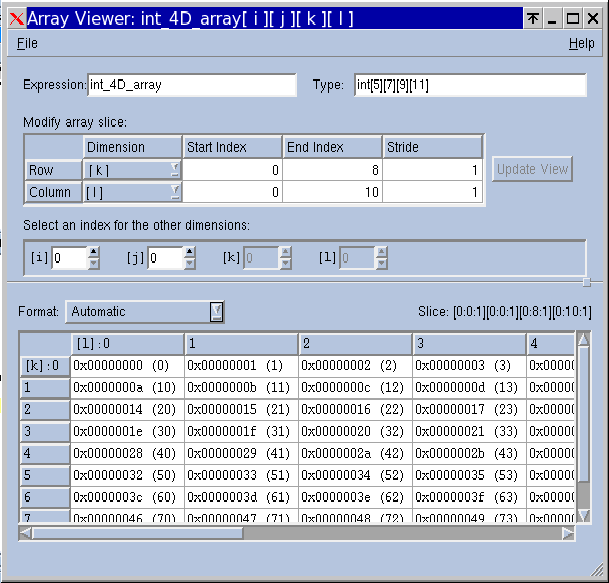 |
When the Array Viewer opens, the initial slice of displayed data depends on the values you entered in the Variable Window. You can change the displayed data by modifying the Expression, Type, or slice controls in the Array Viewer and then pressing the Update View button.
Expression Field
The Expression field contains an array expression based on the value you entered in the Variable Window. You can control the display by changing the value of this field; for example, you can cast the array to another array expression.
Type Field
The Type field also reflects the data you initially entered in the Variable Window. You can modify the type to cast the array to a different array type.
Slice Definition
Initially, TotalView selects the array slice by placing the appropriate array dimension as the row and the column, setting the indices for the lower and upper bounds of the dimensions with a stride of one. Any additional dimensions are held at 0. This is the slice or plane of data that is displayed in the table.
You have full control over all settings, including the ability to change which dimensions appear as rows and columns, as well as their indices and strides. As you change the row and column dimensions, the controls for the other dimensions are enabled/disabled accordingly. You can change the indices of the other dimensions to further refine the slice of data. The User Guide section Using Slices and Strides provides more information on slicing arrays.
Update View Button
When you have finished making changes to the expression, type, and/or slice settings, press the Update View button to update the data in the table display.
Data Display
The selection box at the top left corner of the data table allows you to select the format for displaying the data. The table automatically refreshes in the selected format.
The Slice field at the top right corner of the data table reflects the displayed slice of data.


