Action Point > Properties
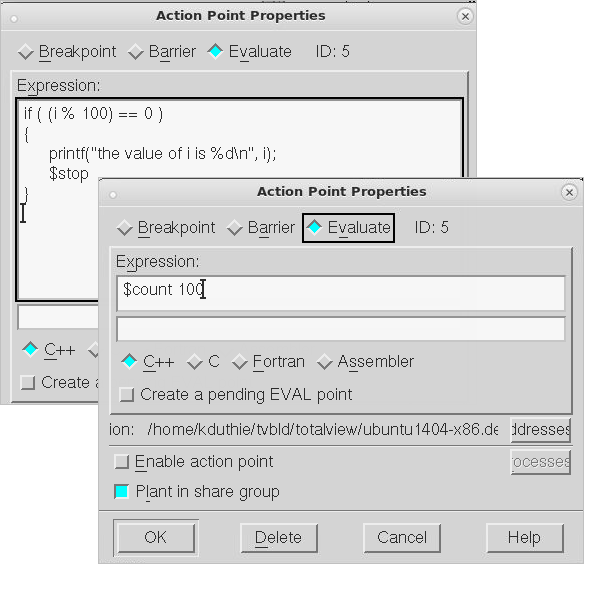
Use this dialog box to modify the properties of an existing action point. This dialog box lets you control attributes of your action point as well as change it from one kind of action point into another. If you are creating an evaluation point, use this window to enter your C, Fortran, or Assembler code.
 |
NOTE: The only kind of action point not controlled by this dialog box is the watchpoint. Use the Tools > Create Watchpoint command within a Variable Window when you want to set or alter a watchpoint.
The following three controls set or change what happens when a program encounters an action point:
When an executing thread encounters a breakpoint, it stops at the breakpoint. Other controls let you indicate if the thread’s process or control group will also stop.
Process barrier breakpoints are similar to simple breakpoints, differing in that they let you synchronize a group of processes in a multiprocess program. Other controls let you indicate if the thread’s process or control group will also stop and what condition must be satisfied for TotalView to release threads held at the barrier.
An evaluation point is a breakpoint that has code associated with it. When a thread or process encounters an evaluation point, it executes this code. You can use evaluation points in several different ways, including as conditional breakpoints, thread-specific breakpoints, countdown breakpoints, and for patching code fragments into and out of your program.
General Controls
The following four controls are used by all three kinds of action points.
Addresses
If the selected line could be mapped to more than one place—for example, you selected a line in a template or an inline function—selecting this button displays a dialog box to refine where TotalView places breakpoints. Do this by individually selecting or clearing the locations at which TotalView will set the breakpoint.
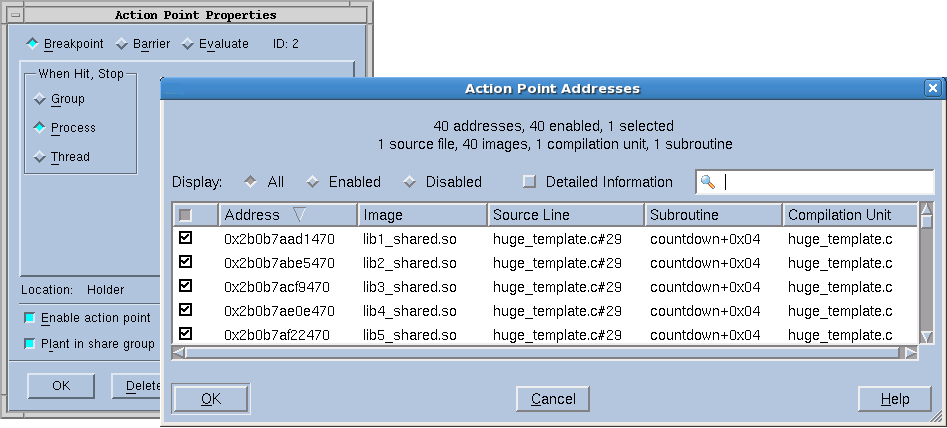 |
Initially, addresses are either enabled or disabled, but you can change their state by clicking the checkbox in the first column. The checkbox in the columns bar enables or disables all the addresses. This dialog supports selecting multiple separate items (Ctrl-Click) or a range of items (Shift-Click or click and drag). Once the desired subset is selected, right-click one of the selected items and choose Enable Selection or Disable Selection from the context menu.
Filtering
In complex programs that use many shared libraries, the number of addresses can become very large, so the Addresses dialog has several mechanisms to manage the data. The search box filters the currently displayed data based on one or more space-separated strings or phrases (enclosed in quotes). Remember that data not currently displayed is not included in the filtering. It may be helpful to click the Detailed Information checkbox, which displays much more complete symbol table information, giving you more possibilities for filtering.
Sorting
Clicking on the column labels performs a sort based on the data in that column. Each click toggles between ascending and descending order. If entry values in a column are the same, the values of the column to the right of the sorted column are examined and sorted based on those values. If the values are the same, the next column is examined and so on, until different values are found. The Addresses dialog uses a stable sort, i.e. if all the entries are the same in the selected column and in the columns to the right, the list is not modified.
Displaying and rearranging columns
Finally, right-clicking in the columns bar presents a context menu for displaying or hiding columns. All are initially displayed except Image. You can reorder the columns by selecting a column label and dragging it to a new location.
Keyboard Shortcuts
To provide easy access to the buttons at the bottom of the Addresses dialog, the following mnemonic keys have been assigned.
Button | Keyboard Sequence |
|---|---|
OK | Alt-o |
Cancel | Alt-c |
Help | Alt-h |
Process
Lets you indicate which process in a multi-process program will have enabled breakpoints. After selecting this button, TotalView displays a dialog box similar to the one it displays when you select the Addresses button. Note that if Plant in share group is selected, this button is not enabled because you’ve told TotalView to set the breakpoint in all processes.
Enable action point
When set, TotalView activates this action point. If this control is not selected, TotalView ignores the action point.
Plant in share group
When set, the action point is shared among all of the threads in the thread’s share group. In all cases, TotalView places an action point in each member of the share group.
If you select this option, TotalView enables (makes active) all of these points.
If you do not select this option, TotalView only enables this action point; all others are disabled.


